Scripting the Draggables
 Edit on GitHub
Tutorial Overview:
- Import and configure a spritesheet.
- Create drop target, stacking and non-stacking draggable UI slices.
- Create an interactive UI canvas with draggables.
Non-Stacking Draggable
Edit the blank Script Canvas graph that was added to the Draggable-Sprite slice. Open 'draggable.scriptcanvas' in the Script Canvas Editor. Save the graph when finished.
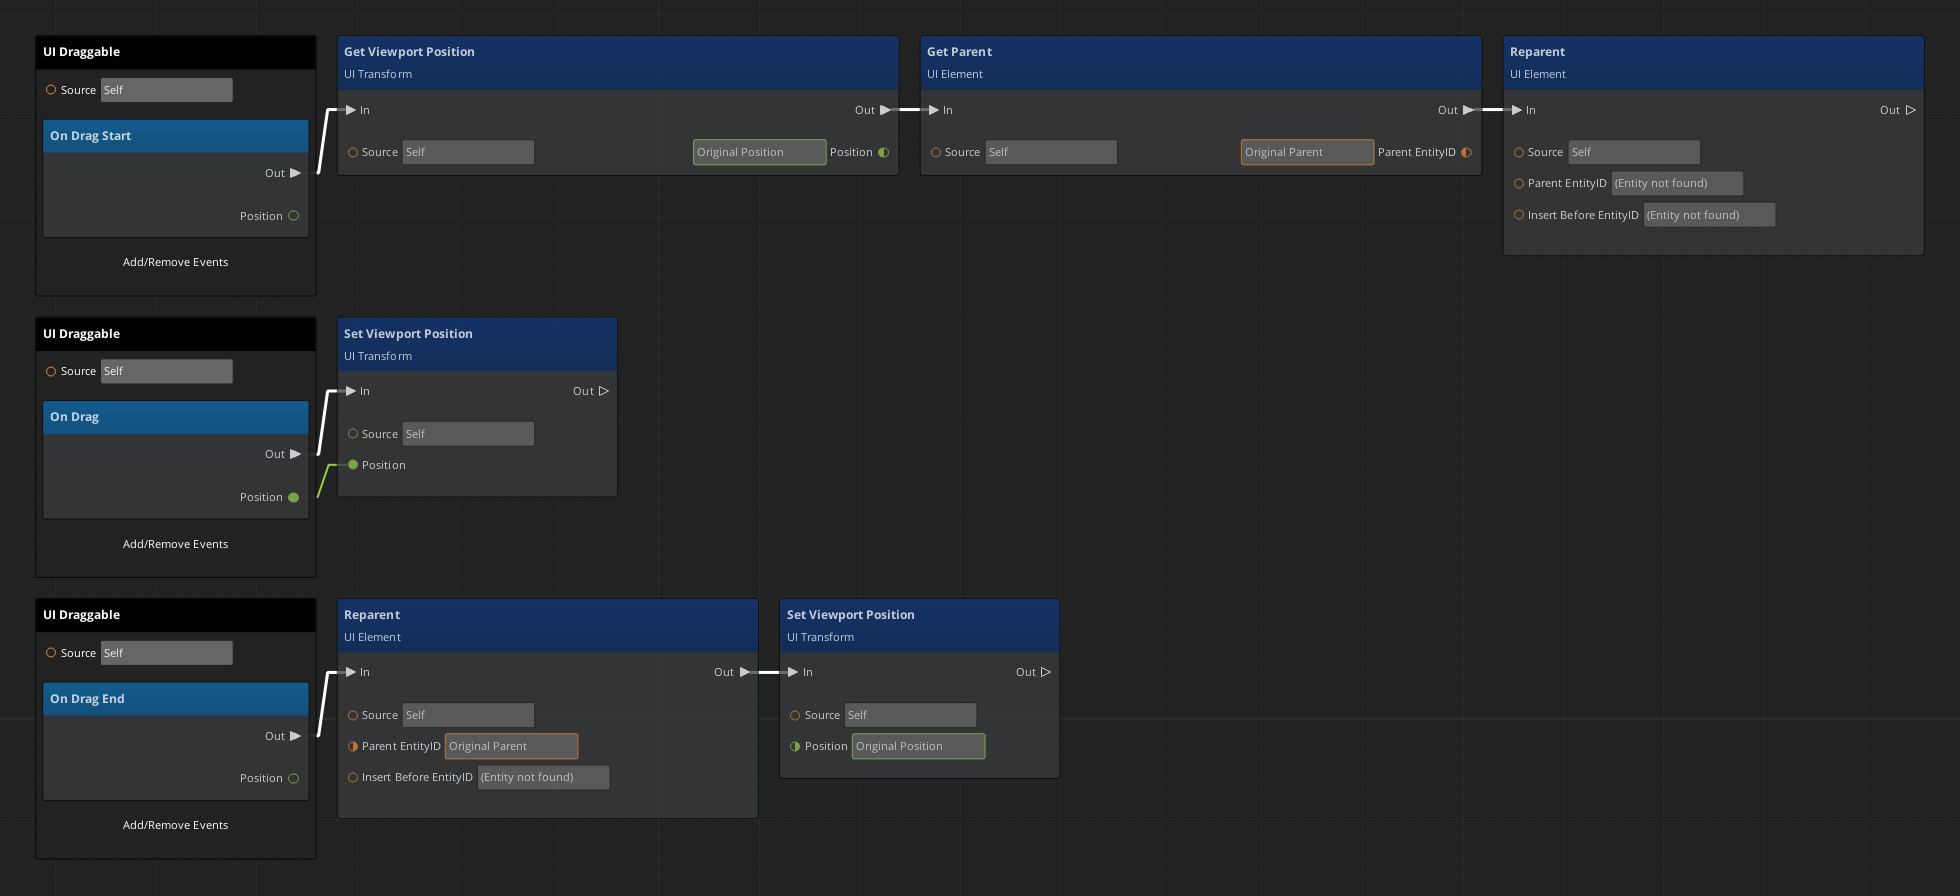
The completed Script Canvas Graph
Graph Variables
| Variable Name | Variable Type | Default Value | Scope |
|---|---|---|---|
| Original Position | Vector2 | - | Local |
| Original Parent | EntityId | - | Local |
How it Works
- The entity is connected to three UI Draggable buses on activation, On Drag Start, On Drag and On Drag End. The Position that is returned when a bus is triggered is the location of the mouse cursor on the UI canvas.
- When a draggable element is pressed with the mouse cursor On Drag Start is triggered. The Original Position of the draggable (not the mouse cursor) is set with the Get Viewport Position node.
- The DropTarget that the draggable is currently on is set with the Get Parent node to the variable Original Parent.
- The draggable is then removed from it's parent with the Reparent node, this is so we can move the draggable across the screen and have it be displayed above other UI elements. On both the Parent EntityID and Insert Before EntityID input parameters, click the 'X' icon to remove the reference to Self. (Entity not found) should appear in the field. There is no entity that we want to parent the draggable to, so the references to (Entity not found) are needed.
- Each tick the draggable is being dragged, On Drag will be triggered. The mouse cursor's Position from the bus is used to set the current location of the draggable on screen with Set Viewport Position.
- When the left-mouse button is released during a drag, On Drag End is triggered. The draggable is always returned to the original position and parent. The Lua script on the Drop Targets will check if a drop was valid or not and move the draggable accordingly.
Stacking Draggable
Edit the blank Script Canvas graph that was added to the Draggable-Stacking-Sprite slice. Open 'stacking-draggable.scriptcanvas' in the Script Canvas Editor. Save the graph when finished.
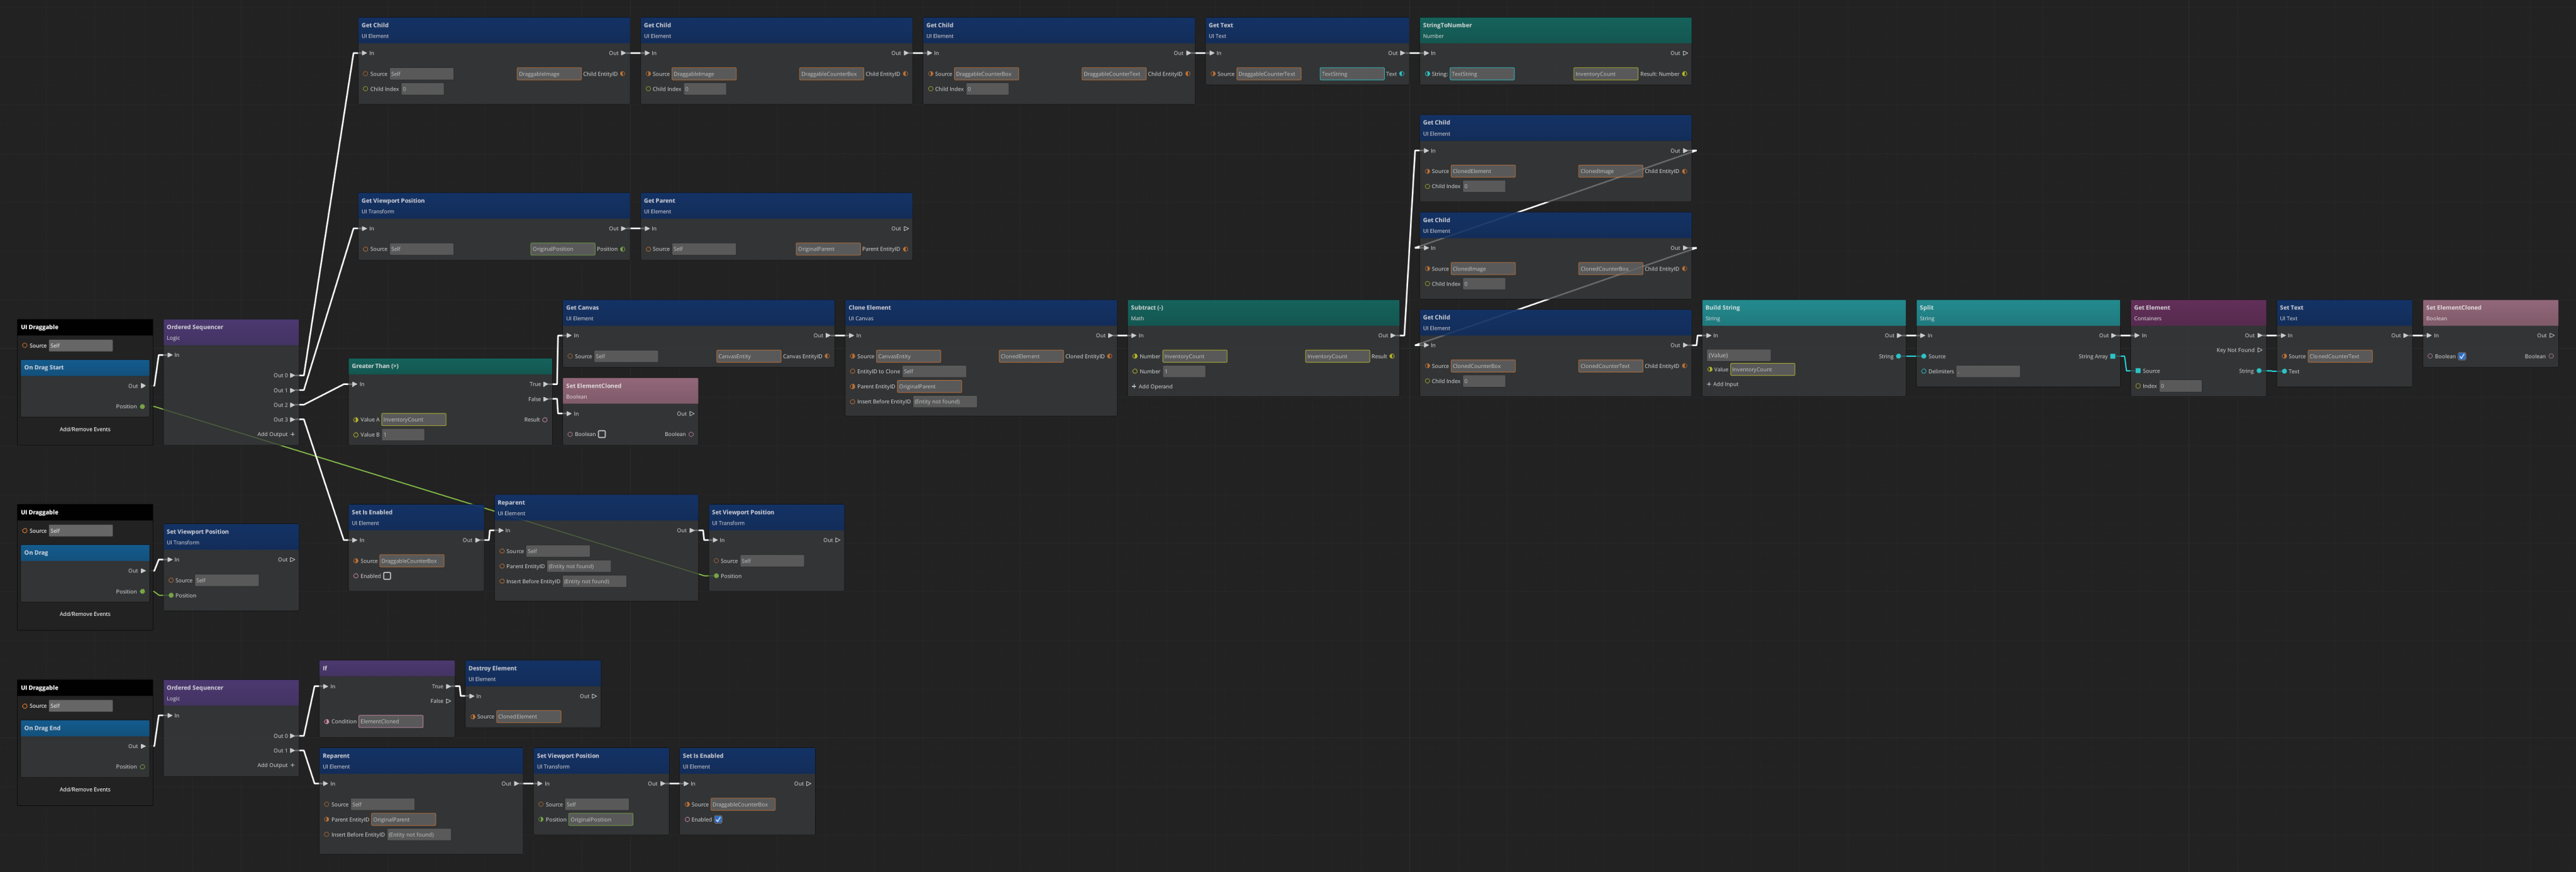
The completed Script Canvas Graph
Graph Variables
| Variable Name | Variable Type | Default Value | Scope |
|---|---|---|---|
| CanvasEntity | EntityId | - | Local |
| ClonedCounterBox | EntityId | - | Local |
| ClonedCounterText | EntityId | - | Local |
| ClonedElement | EntityId | - | Local |
| ClonedImage | EntityId | - | Local |
| DraggableCounterBox | EntityId | - | Local |
| DraggableCounterText | EntityId | - | Local |
| DraggableImage | EntityId | - | Local |
| ElementCloned | Boolean | False | Local |
| InventoryCount | Number | 0 | Local |
| Original Parent | EntityId | - | Local |
| Original Position | Vector2 | - | Local |
| TextString | String | - | Local |
How it Works
- When a stacking draggable is moved that has a count greater than 1, a copy of the draggable is made. The copy has 1 subtracted from it's total. On the original, the CounterBox is deactivated so that it looks like a regular non-stacking draggable. The original will be moved.
- On Drag Start an Ordered Sequencer is used to organize the logic that follows. In Out 0, the CounterText of the draggable is converted to a number. This is the inventory count of the stack, before anything is moved.
- In Out 1, as with the non-stacking draggable, the Original Position and Original Parent is set.
- In Out 2, if the InventoryCount is larger than one, a copy/clone is made of the draggable. If the InventoryCount is 1, ElementCloned is set to False.
- After cloning the draggable, 1 is subtracted from the original stack's count and the new total is set to the cloned element's CounterText.
- In Out 3, the original draggables CounterBox is disabled to hide it. The original draggable is removed from the current parent with the Reparent node.
- Finally, the draggable is moved to the mouse cursor's position, both the original and the clone will be visible on-screen.
- On Drag is the same as a non-stacking draggable, moving the draggable to the mouse cursor's position each tick.
- On Drag End, first, if a clone was made, it is destroyed. The Lua script on the Drop Targets will make a new clone if it is needed.
- The original draggable is then set back to it's Original Parent and Original Position and the CounterBox is unhidden with the Set Is Enabled node.
Test the draggables
With both Script Canvas graphs saved, open the UI canvas you created. Add draggable slices from the slice browser to the Hotbar and Bag1 if there are none. Press the Preview button on the UI Editor toolbar. Valid drops will show in light-green, Invalid drops in light-red. If you try to drop a draggable where there is no drop target, it will be moved back to it's original position. Stacking draggables will only stack if they share the same sprite image.
In the next section of the tutorial, we'll create input bindings and a Script Canvas graph to control the UI, to open the bag inventories when the bagslot buttons are pressed, as well as add a keyboard shortcut to close and open all the bags at one time.