Setting up PhysX Collision Groups
Tutorial Overview:
- Set up a level to use PhysX raycasting.
- Create a reusable function to Raycast to the mouse cursor.
- Create a Script Canvas graph using the Raycast function.
- Filter the raycasts based on PhysX Collision Groups.
PhysX Configuration
- In the Lumberyard Editor in the Tools menu, open PhysX Configuration.
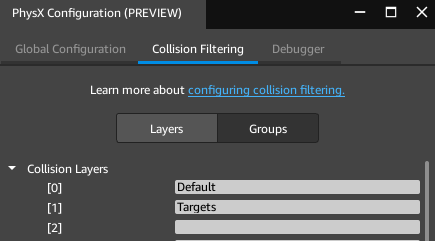
- Select the second tab, Collision Filtering. The Layers tab of Collision Filtering will be displayed.
- Add a Collision Layer named Targets under the Default collision layer.

Completed collision layer setup
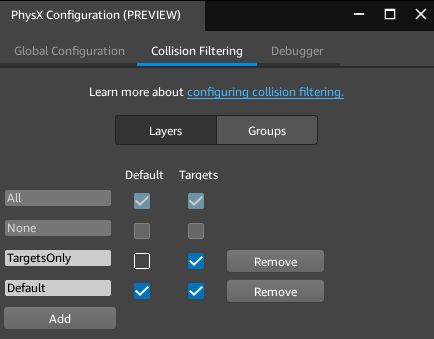
- Select the Groups tab. Collision Groups are displayed in the leftmost column. After that there is a column for each Collision Layer.
- Add a new Collision Group by clicking the 'Add' button under the Groups column. Name it 'TargetsOnly'. This will be the string that the raycast graph and function uses to filter out collisions.
- Set the new TargetsOnly group to only collide with Targets. In the row TargetsOnly, uncheck the box for Default and check the box for Targets.

Completed collision group setup
- Close the PhysX Configuration window.
PhysX Configuration
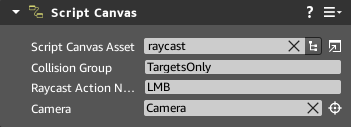
- In the Script Canvas component of the camera entity set the Collision Group input to 'TargetsOnly'

Completed Script Canvas component setup
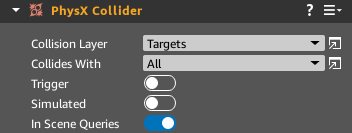
- In the Collider components of each of your target entities, set the collision layer to Targets.
Note: There is no need to change the value of Collides With to TargetsOnly.

Completed PhysX Collider component setup
- Save and play the level. Now only raycast hits on your targets will be displayed!